"Preserve the Taste of Nature with How to Cure Foods!"
Introduction
Preserving food has been a part of human history since the dawn of time. From ancient methods of salting and drying to modern techniques of canning and freezing, curing foods is a great way to extend the shelf life of your favorite foods. Curing foods is a process that involves adding salt, sugar, and other seasonings to food to draw out moisture and preserve it. This process can be used to make a variety of cured meats, fish, and vegetables. In this guide, we will discuss the basics of curing foods, including the different types of curing, the benefits of curing, and how to cure foods at home.
How to Cure Bacon: A Step-by-Step Guide
Curing bacon is a simple process that can be done at home with a few basic ingredients. This step-by-step guide will provide you with the necessary information to cure your own bacon.
Step 1: Gather the Necessary Ingredients. You will need salt, sugar, and curing salt (also known as pink salt or Prague powder). You will also need a container to mix the ingredients in, and a container to store the bacon in.
Step 2: Prepare the Cure. In a container, mix together 1 cup of salt, 1/2 cup of sugar, and 1 tablespoon of curing salt. Stir the ingredients together until they are evenly distributed.
Step 3: Apply the Cure. Place the bacon in a container and pour the cure over it. Make sure the bacon is completely covered with the cure.
Step 4: Refrigerate. Place the container in the refrigerator and let it sit for 7-10 days. During this time, the bacon will absorb the cure and develop its flavor.
Step 5: Rinse and Dry. After the curing process is complete, remove the bacon from the container and rinse it off with cold water. Pat the bacon dry with a paper towel and let it air dry for a few hours.
Step 6: Cook. Once the bacon is dry, it is ready to be cooked. You can cook it in a skillet, in the oven, or in a smoker.
Curing bacon is a simple process that can be done at home with a few basic ingredients. With this step-by-step guide, you can easily cure your own bacon and enjoy the delicious flavor it provides.
How to Cure Olives: A Comprehensive Guide
Olives are a popular and versatile ingredient used in many dishes around the world. They are also a great source of healthy fats and antioxidants. While olives are often eaten fresh, they can also be cured to enhance their flavor and texture. Curing olives is a simple process that can be done at home with a few basic ingredients. This guide will provide a comprehensive overview of how to cure olives.
The first step in curing olives is to select the right type of olive. Olives come in a variety of shapes, sizes, and colors, so it is important to choose the right type for the desired outcome. For example, green olives are best for curing, while black olives are better for eating fresh.
Once the olives have been selected, they should be washed and pitted. This can be done by hand or with a pitting tool. After the olives have been pitted, they should be soaked in a brine solution for several days. The brine solution should be made with salt, water, and any desired seasonings.
Once the olives have been soaked in the brine solution, they should be drained and placed in a container. The container should be filled with a mixture of oil and vinegar, and any desired seasonings. The olives should be left to marinate in this mixture for several days.
Finally, the olives should be drained and stored in an airtight container. They can be stored in the refrigerator for up to two months.
Curing olives is a simple process that can be done at home with a few basic ingredients. By following the steps outlined in this guide, you can easily create delicious and flavorful olives that can be enjoyed in a variety of dishes.
How to Cure Fish: Tips and Techniques
Fish are a popular source of food and can be prepared in a variety of ways. Curing fish is a traditional method of preserving it for later use. This article will provide tips and techniques for curing fish.
The first step in curing fish is to choose the right type of fish. Fish with a high fat content, such as salmon, mackerel, and herring, are best for curing. These types of fish have a higher oil content, which helps to preserve the fish and give it a unique flavor.
Once the fish has been chosen, it should be cleaned and gutted. The scales should be removed and the fish should be washed thoroughly. The fish should then be cut into smaller pieces, depending on the desired size.
The next step is to prepare the curing mixture. This mixture typically consists of salt, sugar, and spices. The amount of salt used will depend on the type of fish being cured. For example, salmon requires a higher salt content than other types of fish. The sugar helps to balance out the saltiness of the mixture and the spices can be used to add flavor.
Once the curing mixture is prepared, the fish should be placed in a container and covered with the mixture. The container should be sealed and placed in a cool, dry place for several days. The length of time will depend on the type of fish being cured.
Once the curing process is complete, the fish should be rinsed off and dried. The fish can then be stored in an airtight container in the refrigerator for up to two weeks.
Curing fish is a simple process that can be used to preserve fish for later use. By following these tips and techniques, you can ensure that your fish is properly cured and ready to be enjoyed.
How to Cure Cheese: A Beginner’s Guide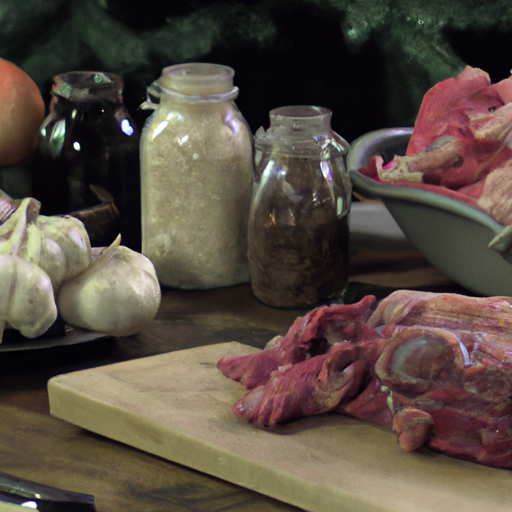
Cheese is a beloved food item that has been enjoyed for centuries. It is a versatile ingredient that can be used in a variety of dishes, from macaroni and cheese to grilled cheese sandwiches. While cheese is widely available in grocery stores, many people enjoy the process of making their own cheese at home. Curing cheese is a process that requires patience and attention to detail, but with the right guidance, anyone can learn how to cure cheese.
The first step in curing cheese is to select the right type of cheese. Different types of cheese require different curing methods, so it is important to choose the right type of cheese for the desired outcome. Once the type of cheese has been selected, the next step is to prepare the cheese for curing. This involves cutting the cheese into small cubes or slices and then salting it. The amount of salt used will depend on the type of cheese being cured, but it is important to use enough salt to ensure that the cheese is properly cured.
Once the cheese has been salted, it is time to place it in a curing chamber. This is a container that is designed to maintain a consistent temperature and humidity level. The curing chamber should be kept at a temperature of between 50 and 55 degrees Fahrenheit and a humidity level of between 75 and 85 percent. The cheese should be left in the curing chamber for a period of time, usually between two and four weeks. During this time, the cheese will slowly lose moisture and develop its flavor.
Once the cheese has been cured, it is important to store it properly. Cheese should be stored in a cool, dry place, such as a refrigerator or cellar. It should also be wrapped in wax paper or cheesecloth to protect it from moisture and light. Properly stored cheese can last for several months.
Curing cheese is a rewarding process that can result in delicious, homemade cheese. With the right guidance and a bit of patience, anyone can learn how to cure cheese.
How to Cure Meats: An Expert’s Guide
Curing meats is an ancient practice that has been used for centuries to preserve and enhance the flavor of meats. It is a process that requires careful attention to detail and knowledge of the various curing methods. This guide will provide an overview of the different curing methods and tips for achieving the best results.
The most common curing method is dry curing, which involves rubbing a mixture of salt, sugar, and spices into the meat. This mixture draws out moisture and helps to preserve the meat. The amount of time the meat is left to cure will depend on the type of meat and the desired flavor. Generally, the longer the meat is left to cure, the more intense the flavor will be.
Another popular curing method is wet curing, which involves soaking the meat in a brine solution. This method helps to tenderize the meat and add flavor. The brine solution is typically made up of salt, sugar, and spices, and the amount of time the meat is left to soak will depend on the type of meat and the desired flavor.
Smoking is another popular curing method. This method involves exposing the meat to smoke from burning wood chips or sawdust. The smoke helps to preserve the meat and adds a unique flavor. The type of wood used and the amount of time the meat is exposed to the smoke will determine the flavor of the finished product.
Finally, curing meats with nitrates is a method that has become increasingly popular in recent years. This method involves adding nitrates to the curing mixture, which helps to preserve the meat and give it a unique flavor. Nitrates are typically added in the form of sodium nitrate or potassium nitrate.
No matter which curing method you choose, it is important to follow the instructions carefully and use the correct amount of curing ingredients. Additionally, it is important to store the cured meat in a cool, dry place to ensure that it does not spoil. With the right knowledge and attention to detail, you can create delicious cured meats that will last for months.
How to Cure Fruits and Vegetables: A Comprehensive Guide
Fruits and vegetables are essential components of a healthy diet, providing essential vitamins, minerals, and fiber. Unfortunately, many of these foods can spoil quickly, leading to waste and a loss of nutrition. Fortunately, there are several methods of curing fruits and vegetables that can help extend their shelf life and preserve their nutritional value. This guide will provide an overview of the different curing methods and how to use them.
The most common method of curing fruits and vegetables is dehydration. This involves removing moisture from the food, which slows down the growth of bacteria and other microorganisms that cause spoilage. Dehydration can be done in a variety of ways, including air-drying, oven-drying, and freeze-drying. Air-drying is the simplest method and involves hanging the food in a warm, dry place for several days. Oven-drying requires the food to be placed in an oven set to a low temperature for several hours. Freeze-drying involves freezing the food and then using a vacuum to remove the moisture.
Another method of curing fruits and vegetables is fermentation. This involves using bacteria and yeast to convert the sugars in the food into alcohol and carbon dioxide. This process can be used to make pickles, sauerkraut, and other fermented foods. To ferment fruits and vegetables, the food must be placed in a brine solution and left to sit for several days.
A third method of curing fruits and vegetables is canning. This involves heating the food in a sealed container to kill any bacteria or microorganisms that may be present. Canning is a great way to preserve fruits and vegetables for long-term storage.
Finally, curing fruits and vegetables can also be done through the use of salt or sugar. This method involves packing the food in a mixture of salt or sugar and then leaving it to sit for several days. This helps to draw out moisture and preserve the food.
Curing fruits and vegetables is a great way to extend their shelf life and preserve their nutritional value. By using one of the methods outlined above, you can ensure that your fruits and vegetables stay fresh and nutritious for longer.
How to Cure Nuts and Seeds: A Step-by-Step Guide
Curing nuts and seeds is a simple process that can add flavor and texture to your favorite recipes. Whether you’re looking to make a crunchy snack or a savory dish, curing nuts and seeds can be a great way to add flavor and texture. Here is a step-by-step guide to curing nuts and seeds.
Step 1: Gather Your Ingredients. You will need your chosen nuts or seeds, a baking sheet, and a shallow dish.
Step 2: Preheat the Oven. Preheat your oven to 350°F (177°C).
Step 3: Spread the Nuts or Seeds. Spread the nuts or seeds on the baking sheet in an even layer.
Step 4: Bake the Nuts or Seeds. Place the baking sheet in the preheated oven and bake for 10-15 minutes, stirring occasionally.
Step 5: Cool the Nuts or Seeds. Once the nuts or seeds are golden brown, remove them from the oven and transfer them to the shallow dish. Allow them to cool completely.
Step 6: Store the Nuts or Seeds. Once the nuts or seeds have cooled, store them in an airtight container in a cool, dry place.
Curing nuts and seeds is a simple process that can add flavor and texture to your favorite recipes. With this step-by-step guide, you can easily cure your own nuts and seeds at home. Enjoy!
Conclusion
In conclusion, curing foods is a great way to preserve and enhance the flavor of food. It is a simple process that requires minimal ingredients and equipment. With the right ingredients and techniques, you can create delicious cured foods that will last for months. Curing foods is a great way to enjoy the flavors of the season all year round.

